Smart Control of a 1940's Three-Way Switch with Shelly 1L
- Matt Zaske
- September 26, 2022
- 8 minutes
Once I settled on jumping into home automation and Home Assistant (HA), the first "practical" thing I wanted to address was the issue of lights being left on at random throughout the house. Some fixtures were greater offenders than others, but with a control mechanism like HA I could actually begin to address what others wouldn't. My real target relates to energy conservation in the long term, not necessarily dollars spent on solving a problem.
Offender #1: The Stairwell Lights
For years, it seems like it's impossible for certain folks in my household to flip the switch at the top or bottom of the main stairs. The presence of a switch at both ends be damned, it just doesn't happen. Queue frustrated me, getting out of my chair (in evenings), disturbing the cat in the process, to flip a switch. Regardless of the children's age (I was hoping it'd be a passing fad), this behavior hasn't changed. It was a fine time to convert this to a smart switch.
Most smart single-pole switches are easy to install, and for switch loops with a neutral wire pretty much any boxed solution works great. A three-way setup is always its own unique adventure. Three-way switches in stairwells have been commonplace/required for a long time, and my 1940 house is no different. What is different nowadays is in wiring standards/code...and switch loops. In my house, about three-quarters of the light switches have a neutral wire available, but this is dependent on where in a given circuit the switch/fixture lay. Some just don't have a neutral, and the three-way switches fell into this category. They're on a switch loop configuration without a neutral with the traditional/requisite travelers. Bummer.
A quick disclaimer: I am not a licensed electrician and, while I have a solid grasp of all the requisite concepts and safety requirements (and have a done a substantial amount of my own electrical work), this post is specific to my configuration and presented as a (hopefully helpful) reference point. If you are not comfortable understanding the risk of such changes or figuring out how circuits are (safely) wired, leave something like this to a professional. Really Bad Things can happen should something go awry.
Life Without Neutrals
Without an available neutral, the options for smart light switches are pretty abysmal. The few options I found were pretty poorly reviewed, right down to issues with devices melting or "catching fire." I held off on moving forward on this as a result, resolved to a life of not being able to deal with this offender unless I pulled a neutral into one of the switch boxen. The area in question is in an entirely plaster-covered world, and the switch loops come from the attic now completely isolated from access thanks to our insulation job a couple years back.
Enter...the Shelly 1L
I stumbled across the Shelly line of relays when searching for options on controlling my garage door. In looking around at their options, the Shelly 1L met all the requirements I had: namely that it works with or without a neutral, has a super small form factor, overheat protection, and works with small loads (under ~4 amps)...which is perfect for lighting.
It was time to buy a few of these bad boys, and for less than $20 apiece it appeared as though I'd have a real solution to this problem!
Mapping It Out
I made note of how the old/current setup was wired as best I could, and ended up with this basic diagram:
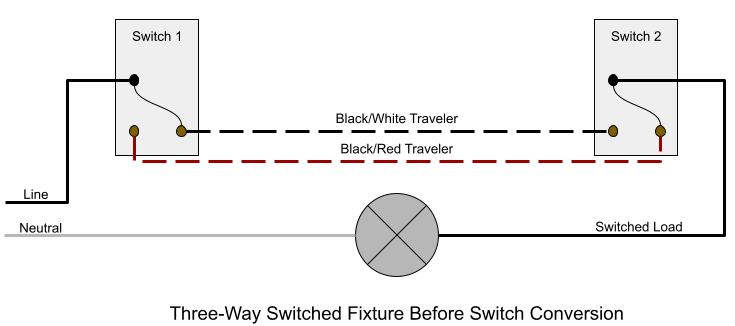
Since I didn't want the Magic Smoke to appear when installing, having a solid idea of what wires were serving what purpose was important. The Google didn't have a lot of great hits for my specific situation, but I did find a viable diagram to get me over the hump of figuring out the necessary changes, most of which was "which terminals are actually necessary in this situation?"
In this setup, it is not necessary to use either of the Sx switch terminals for signaling. The only terminals necessary are:
Lfor (hot) line in;Ofor the Shelly relay switch output; andSW1andSW2for hot (line) out to each switch.
Why Not Signaling?
This is where I got hung up the most...it felt like I should need another set of wires for the switches. In essence, I am changing a single pole dual throw (three-way) switch into a single pole single throw (standard) switch. The "three-way" functionality of the switches are no longer necessary due to how the relay "gets in the way" of the setup. I could not figure this out based on the provided diagrams from Shelly and other stuff I'd found on the Internet.
I Skipped a Part, or Try and Try Again
I don't want to get hung up in the details, but there were a few failed iterations of getting this installed and working. Nothing created the Magic Smoke effect, but something that would cause one switch or the other (or just the relay) to behave. I'm omitting the majority of this detail due to the nuance of a problem I unknowingly created over a decade ago when cutting/splicing in a second light fixture for the stairwell. In doing so, I "broke" the three-way circuit in a way that is still electrically safe and works under traditional circumstances, but requires I install the Shelly 1L in ONE specific switch location. The other location (or alternatively installed in the ceiling box) simply would not work, or cause one of the fixtures to be constantly on/unswitched (see also: quirks of some wiring standards in the 1940's).
My old multimeter had also died (replaced, but not until after I made things work), so I wasn't able to trace out things like I'd preferred, so it was a bit of trial and error to find the right location. For me, it was the "downstairs" switch box.
It's Alive!!
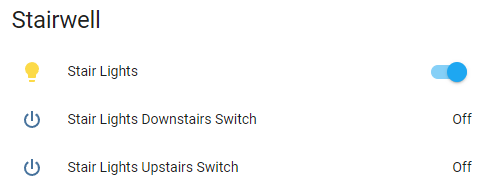
From my "downstairs" switch box, it works flawlessly!
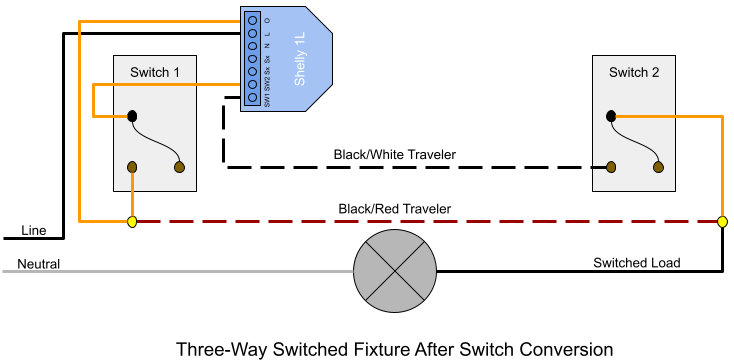
The key takeaway here is that with three short "new" wires (identified orange in the diagram above), along with two wire nuts (yellow), the conversion to a four-way smart switch is complete and functioning. The setup requires that the SW1 and SW2 button/switch inputs are changed to "Edge" type for the relay configuration (through its web interface or the app):
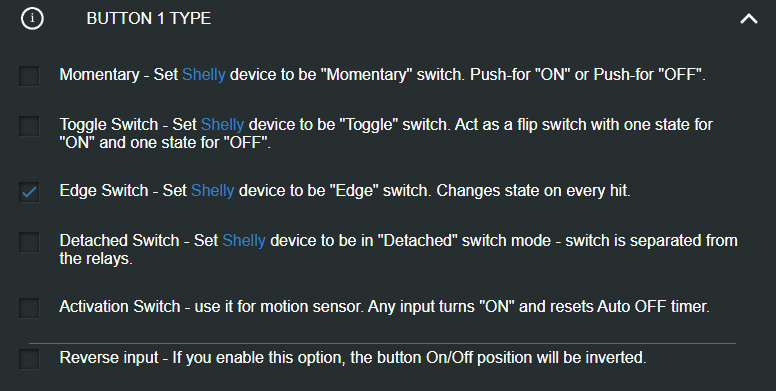
With the relay set to "Edge" mode, the switches work and behave just as they always have!
Where's Home Assistant and what about Automations?
Shelly devices work beautifully with HA, and the 1L exposes several sensors/states, including:
- relay state
- switch channel statuses (on/off)
- device temperature
- device overheating status
- uptime
- signal strength
I have a HA dashboard where my temperature sensors report, and on said dashboard I've included the running temp of the Shelly devices. They can get a little hot (hotter than I'd expected in the 130-degree range), but most of the time they are sitting in the upper 90-degree range. I've not seen one go higher than 140 in my environment, but I also have a notification automation to let me know if that happens for safety's sake.
Back to the Key Automation
I really wanted to be able to automatically shut off these stairwell lights after a set period of time. Out of the box, I decided to use a five-minute timer:
alias: Stairwell | Lights | Timer Start
description: ""
trigger:
  - platform: device
    type: turned_on
    device_id: <randomstring>
    entity_id: light.stairwell_lights
    domain: light
condition: []
action:
  - service: timer.start
    data: {}
    target:
      entity_id: timer.stairwell_lights_timer_5_minutes
mode: single
The timer is triggered when the lights are switched on, and the desired automation begins at the timer's conclusion:
alias: Stairwell | Lights | Off (by Timer)
description: ""
trigger:
  - platform: state
    entity_id:
      - timer.stairwell_lights_timer_5_minutes
    to: idle
condition:
  - condition: device
    type: is_on
    device_id: <randomstring>
    entity_id: light.stairwell_lights
    domain: light
action:
  - type: turn_off
    device_id: <randomstring>
    entity_id: light.stairwell_lights
    domain: light
mode: single
This automation has a condition requiring the stairwell lights to be on at the time of the trigger. It verifies that if someone "manually" turned off these lights before the timer, it won't run. This is likely unnecessary, but something I've been putting in place for most of my lighting automations to ensure nothing weird or unexpected is triggered. A safety catch, if you will.
Auxiliary Automations
Shelly devices can support Alexa voice control (by adding the Shelly skill in Alexa), and I have done so. This requires the devices be allowed to check in to the Shelly cloud. I've chosen to leave that functionality open, and according to my Pi-Hole data they are super quiet (the usual query is for time updates), but YMMV. Alexa voice control (in addition to HA) hasn't proven to be terribly useful to date, but this relay is pretty limited in what I want/need of it so we'll see what happens in the longer term.
I've got this device tied up with a couple of scenes in HA in which I control groups of devices, but most important of everything: I no longer have to get up, disturb the cat, and manually flip the switch anymore (or alternatively holler at one of the children to do so). Is it enablement? Maybe. But for less than $20, definitely worth it, and well worth not having to pull wires behind plaster covered walls.
If you're running HA (or even if you're not and have some weird situation where smart control would be useful), Shelly devices are definitely a place to look!
Recent Posts
Past Speaking Engagements
I was a speaker at MMSMOA, May 3-7, 2026!

I was a speaker at MMS Music City Edition, October 12-15, 2025!

I was a speaker at TCSMUG Autopilot/OSD Day, July 15, 2025!
![]()
I was a speaker at MMSMOA, May 4-8, 2025!
I was a speaker at BrainStorm K20 Wisconsin Dells, March 9-11, 2025!

I was a speaker at MMS Flamingo Edition, October 20-23, 2024!

I was a speaker at TCSMUG OSD Day, July 31, 2024!
![]()
I was a speaker at NWSCUG, July 19, 2024!
![]()
I was a speaker at MMSMOA, May 5-9, 2024!
I was a speaker at BrainStorm K20 Wisconsin Dells, March 10-12, 2024!
I was a speaker at MMS Miami Beach, October 29-November 1, 2023